 With a number of advancements in Google Analytics technology recently, I wanted to write this post to bring together how you can make the most of some of these new and exciting features through a simple implementation guide.
I’m going to take you through how to set your Google Analytics Tag Manager for both the standard tracking code and the new Universal Analytics tracking code as it’s really easy to do both of them in one go and if you’re migrating to Tag Manager or Universal Analytics you might as well do all of it in one go to save time, resources and money and of course to start using advanced tracking as soon as possible.
So, what are these cool new features that I’m going to cover today? The mains ones are:
Google Analytics Tag Manager
Google’s very own tool to make it easier for us to make code changes to websites, pop one chunk of code on the site and then choose what you want it to do in the Tag Manager admin area without making additional code changes. Great for saving time and resources, testing and keeping on top of new tracking functionality. It’s also great for managing code on multiple sites. Oh and it’s free!
Universal Analytics
This is Google’s new method of tracking website traffic and interactions. It focuses on users rather than sessions which means that it will be able to tie up visits by the same user on multiple devices. This gives Google Analytics its place in the rise of mobile internet activity and means those of us with mobile sites can start to see full user journeys across different devices rather than treating every session as a new user.
Universal Analytics is going to be the method to use moving forwards, however I will also cover how to use Tag Manager for the classic asynchronous version of Google Analytics tracking code which the majority of people are using already. I’d recommend using both until you’re completely happy with the new Universal Analytics set up as the data will be different to the classic accounts so historic comparisons won’t be possible. While you’re adding one it’s an additional 5 minutes to add the other so it’s definitely worth doing.
For more information about the benefits of Universal Analytics check out this post by my colleague Gemma: What Is Universal Analytics And Why Is It So Awesome?
Getting Started with Google Tag Manager
If you’ve read anything about Google Tag Manager you will have come across some terminology that you might not be familiar with. I’ve outlined a little Tag Manager Glossary to help you understand it better:
| Term: | What it refers to: |
| Google Tag Manager (GTM) | The main interface for managing the account and code. |
| GTM Snippet | The main piece of code implemented on sites using GTM. |
| Account | The top level of the GTM interface, there should be one account per company. |
| Container | The name for where all code relating to one website is managed; there should be one container per domain. |
| Tags | The different pieces of code used to add tracking to sites. |
| Rule | A set of instructions that sets what should happen. |
| Event | An additional action specified to be triggered (fire), used with rules and macros. Not to be confused with Event tracking in Google Analytics. |
| Macro | A way of pulling in dynamic data, to be used with rules and events. |
| Data Layer | Additional code on the website to pull extra information into the container, which can then be used in tags, rules, macros and with events. |
When it comes to setting up Tag Manager, Google Analytics recommends the following process, each point will be covered in detail below:
- Create account and structure within GTM
- Map out the sites and all the tags that will be required
- Install the relevant GTM snippet on each website
- Add any additional code to site (Data Layer APIs) for extra data collection
- Set up tags, rules and macros in the GTM interface to instruct tracking code to fire and data to be gathered, this is where Universal Analytics come in too
- Preview and test configuration and code
- Remove old tags
- Push changes live (‘Publish’ container)
For Google Analytics’ own recommendations see this document:
I found I needed a bit more information than was in here the first time I used Tag Manager so I’ve explained everything in more detail below.
Step 1 – Creating a Structure
GTM is best set up by having one Account per company and within that, setting up one ’container’ per domain. A container is what is used to manage the code and data being fired. This ties in nicely with the Google Analytics (GA) best practice of having one GA account per domain as each GA account will be referenced by one container.
There are varying levels of user access which can then be used to give the relevant people the correct permissions (viewing, editing, publishing etc).
- Sign up / in here
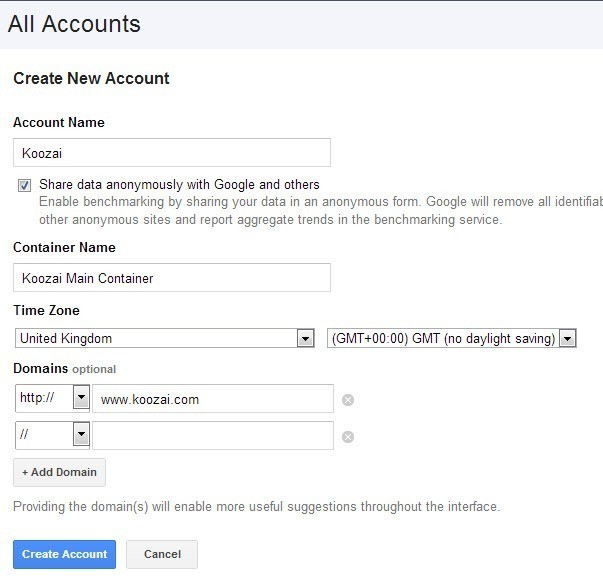
- Click New Account
- Name it clearly
- Give the container a name (ideally you will only have one per account but on some occasions you may need more).
- Choose the suitable time zone for the business
- Specify which domain(s) this account is for
- Hit ‘Create Account’
- Accept the Terms of Service Agreement
- Receive the code for your container (we’ll use this in step 3)
When you first set up an account there will be no tags as you won’t yet have specified what you want to track, but there will be 1 rule and 5 macros already set up for you to use when you start adding tags. You’ll get your head around these soon enough, but to expand on the little glossary above, it works like so:
Tags are for the code you want (one tag per item of code, one will be for the GA tracking snippet)
Rules tell the tags when to fire (i.e. fire on all pages (already set up for you) or on the domain xyz.com only), this one easy setting decides which pages the each piece of code goes on.
Macros are used to identify dynamic elements that can then be used in Rules, the default ones should suffice for basic implementations. You can use Data Layers in these (remember this for later). At this stage you will probably want to head over to the Users & Settings area and give your developers or team access to the Tag Manager account so that you can work on it together.
Step 2 – Map out the sites and tags required
Before you start putting together any code or editing anything you should map out every single piece of tracking that you need. This will help you consolidate the plans and work out how much resource you will need for coding and implementation, however big or small your implementation.
Tag Manager can be used to handle more than just your standard analytics code, it can be used for:
- Google Analytics Tracking Code (Classic and Universal)
- Google Analytics customizations, including; Ecommerce, Event tracking, Custom Variables, Virtual Pageviews
- Google AdWords Conversion Tracking
- Google AdWords Remarketing Tags
- DoubleClick Tags
- AdRoll (remarketing)
- comScore
- And more!
You can also add custom HTML tags where you put the code in yourself and use Tag Manager to handle it.
It’s a great opportunity to have a fresh look at the website and see if there is anything else you’d like to track. If you’ve only been tracking the bare minimum so far, check out these two posts for some additional ideas:
The Complete Google Analytics Event Tracking Guide Plus 10 Amazing Examples
At this stage, it is beneficial to put together a suitable naming structure for everything you’re going to be tracking. This includes how you’re going to label your Event Tracking, Custom Variables and even how to keep the implementation consistent by making sure everyone uses the same terms across different areas of the website or business. This makes life a lot easier for developers, marketers and anyone reviewing the data in analytics. You can’t rely on everything thinking the same way you do or having documentation to hand to decipher things so try to make everything nice and easy to understand and stick to one naming convention.
Skip ahead to Step 4 to see more about Data Layers to help you plan these too.
Step 3 – Add the GTM Container Snippet
This is where it starts to get real, you now need to place the GTM Container Snippet (main chunk of code) on to every page of the website, just after the opening <body> tag. In theory it can go anywhere EXCEPT in the head.
If you didn’t add it when you first set up the account you will need to go to Users & Settings > Settings and then copy the Container Snippet which is found at the bottom of this page.
If you’re updating two websites through the same GTM Account you can manage them with the same container, you would just need to write suitable rules for their individual codes so that the right ones fire on the right sites, but we’ll cover that more under the rules section. Implementing tracking code in the back end comes in step 5.
Step 4 – Add Additional Code (Data Layers etc)
Data Layers will need to be added to websites, in addition to the container snippet. You don’t have to use them, but they can make things easier. They are used to find and store the information that you want to pass on to GTM. This includes transaction data for ecommerce tracking and information to use in Event tracking in Google Analytics. You could pull this in from the HTML of the page without using Data Layers, but the tracking would then break if they HTML changed, whereas if changes were being made to a website the data layers could remain in place while the HTML elements may change over time, allowing continued data collection without having to re-code or update all the tags in GTM.
Data Layers can accept dynamic data such as ecommerce transactions, as well as static data such as the Page Title. They are generally written in JavaScript and should go in the <head> of the site in order to load before the container.
Justin Cutroni has written a good post explaining Data Layers (written before GTM launched but highly relevant): Make Analytics Better with Tag Management and a Data Layer
And here are two in depth guide to setting up Event Tracking with Data Layers here on Search Star and Moz.
Step 5 – Set up tags, rules and macros
Now that you have set up the Tag Manager Account, chosen what you want to track and added the code to the site, you need to set up tags with the tracking elements you want to use, rules to tell each tag when to fire and macros to enable the rules to run on dynamic elements.
To use your existing Google Analytics account
Within Tag Manager navigate to Container Draft, then Overview, then Tags
- Click New Tag (at the top)
- Give it a clear name, such as ‘Google Analytics Async Tracking’
- Click the Tag Type option and select Google Analytics
- Pop in your UA code (there is the option to use a macro to specify which UA code it should be, but most implementations don’t need that level of complexity.)
- If you want to use remarketing through Google Analytics just tick the ‘Add Display Advertiser Support’ box
- For standard tracking leave the Track Type as Page View (you change this when you have custom GA tracking to set up)
- Finally, click Add Rule to Fire Tag and choose All Pages – there is a default rule for this that you can select, if you only want it to fire on certain pages you will need to write a rule for that
- You can also set up rules to block the tag from firing under certain circumstances with the next setting if you need to
- Hit Save
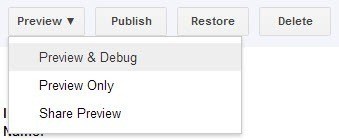
Once you have created the tag and rule you will need to test it out, to do this from the Overview page click Create Version (at the top), GTM then takes you to the Versions area through which you can hit Preview and then Preview and Debug. This allows you to check whether or not everything you have just saved to this container will work on the site.
Once you have tested it and all of the tags that should have fired you are safe to hit Publish and start seeing the data in your Google Analytics account.
To set up Universal Analytics
Now the crux of this post, while you’re implementing Tag Manager I recommend setting up Universal Analytics and using this alongside your existing Google Analytics account.
To get started with this you will need to log in to your Google Analytics account and go to the Admin area, within this you need to be at the account level rather than property or profile level, you can get here by using the breadcrumb to click on the name of the account.
From here, click +New Property (as you can’t switch existing accounts from classic to universal).
Choose Universal Analytics (which is now the default option)
Pop in a clear name and the website details then hit save
You will now be given a new piece of code to use on the site, which you could just go ahead and use, however, having two pieces of code on the site will become confusing in the future, which is where Tag Manager steps in.
So, rather than pop this code on the site, copy the UA-12345-67 style code and head back to Tag Manager.
To Add Universal Analytics Tracking Code in Tag Manager
Start from the Container Version Overview
- Create a new Tag
- Name it clearly
- Tag Type: Universal Analytics
- Tracking ID: paste in your UA code (i.e. UA-12345-67)
- Track Type: Page View
- Add Rule to Fire Tag: Select the All Pages rule
- Save
- Now create a version of the container, preview and debug to test it before publishing it
It’s as simple as that!
Important Issue
An important aspect to bear in mind with Universal Analytics is that it uses a completely different library of code, meaning all the event tracking, ecommerce tracking and other custom code in use on site will need to have it’s tracking updated (for a full migration to UA) or added to in order to pass the data to both the classic and Universal Analytics accounts.
Swell Path have created and shared some great resources to help with code for Universal Analytics, I definitely recommend checking out their Universal Analytics Cheat Sheet.
Final Points
Now that you have set up Tag Manager, you can add new Tags at any time without having to change the code on your website. New functionality will be at your fingertips. It’s also a safer way to use code for more than one account than the previous roll up method of putting two UA codes on your website, as this post has just done with classic and Universal Analytics accounts.
If you have any questions please leave them below.


Leave a Reply