
We love digital 0330 353 0300
Google Tag Manager (GTM) is a powerful tool and when properly understood and implemented, can be an SEO’s best friend.
However, before you can actually begin a migration to GTM, you need to take some key steps to ensure everything goes to plan.
One of the biggest challenges when looking to migrate over to a tag management system such as GTM is getting buy-in from all parties involved. This includes the client or internal parties, web developers and marketers.
Different parties have different reasons to oppose the implementation of GTM, and fully understanding all of the risks and concerns is key to getting the whole team on board.
For example, the idea of using a tag management system can make developers uneasy because it takes away some of their control over the site and puts it in the hands of other parties, such as agencies and marketing departments. This can make them fearful that if something goes wrong, they’re going to have work to do to clean things up. This is why the next step, and properly communicating it to all parties, is so important.
Before you get started, it’s important that you have a clear plan for migrating and launching GTM, which includes considering at least two key elements; users and tags.
Users, permissions and responsibilities
Coming back to the issues and concerns you may face from different parties when looking to introduce a tag management system, it’s essential that you have a full picture of who will be using the system and what for. You need to be able to answer the following sorts of questions:
It is vital that you understand the power and essential risk of using GTM wrong, as it has the potential to fire tags that could change or even break the site. Making sure that you have a clear allocation of responsibilities and only grant full publish rights to a small, capable number of people, is essential.
This post from Luna Metrics goes into more detail on how to address Google Tag Manager security risks.
Know Your Tags
Next you should review your site and make a list of the tags you know you’re going to need from the off. In some cases, this might just be standard Google Analytics pageview tracking, but some other tags to consider if you’re using them would include:
Make a list of all the tags you’re going to need and start thinking about what pages you’ll need to fire them on. For example, the Google Analytics code should go on all pages, whereas the AdWords Conversion code needs to go on your checkout confirmation page. Make sure you can start to visualise the tags you’ll need and the way they’ll need to be handled before you even start your set-up. This will help to ensure that everything goes as smoothly as possible later on.
When you have a solid plan in place and everyone on board, it’s time to set up GTM. However, this doesn’t mean that you need to go live or start removing code from your site. One of the many beauties of the system is that you can get everything in place and test in Preview mode. This means that you can see exactly how everything is going to behave before it goes live. That way you know that when you hit Publish, everything is going to work as expected.
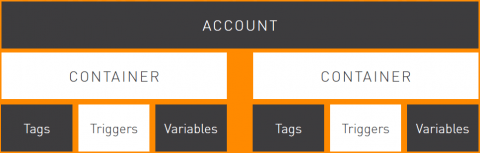
You need at least one container in GTM, where all your tags, triggers and variables sit. However, you may need more than one, as you should have a separate container for each of the following:
In some cases, you might also want separate containers for different subdomains if the tags you need for each behave very differently.
Within your container(s) you need to create your tags, triggers and variables using the now-more-intuitive interface. For more information on the structure of GTM and how to structure your GTM containers, my Complete Guide to Google Tag Manager might come in handy.
Setting up Tag Manager may not take very long if you only have a few tags to create, but could be a much bigger job if you’re running complex scripts and tracking.
When in Preview mode, you can even see Real Time Analytics data based on your visits, and only your browser will be running Tag Manager (until you publish).
Better still, you can run a separate GTM container on your staging site and test in Preview mode and when published, knowing that your published container is only live on your staging site. Once you’re happy with that, it’s a simple case of migrating over to your main container and publishing there.
When you’ve tested your setup and are ready to launch, going live with GTM is as easy as hitting publish. The power of GTM is the ability to add and amend tags without changes on-site, so it’s unlikely that once you first hit Publish, you’ll never add or amend things again. GTM gives you the freedom to tweak tags, set up new tracking easily, and much more. Don’t forget, each time you make edits in the GTM environment, continue to test before going live.
The Versions section of GTM is also really useful for keeping track of your changes. Each time you publish, a new version is created which allows you to track changes and rollback if you encounter any snags. Make sure you give your versions useful names and descriptions so you know exactly what changes were made, as this will help when debugging any issues and choosing what version to rollback to.
When you’re ready to get a bit more advanced, LunaMetrics have some great “recipe packs” you can try which allow you to gather more insights. These packs are well worth trialling, such as scroll tracking, YouTube embedded video tracking, file download tracking and more.
If your GTM migration uncovers wider tracking or crawlability issues, our technical SEO team can help resolve them alongside the tag setup.
There’s so much you can do with Google Tag Manager, so I’m a big advocate of the system. As long as you have a clear plan and carry out thorough testing, GTM is a really powerful tool for marketers.
Happy tagging!
