 Google Webmaster Tools is a free tool provided by Google, which allows you to see some interesting data about your website. This post looks at the different functions within Google Webmaster Tools and some of their uses and limitations.
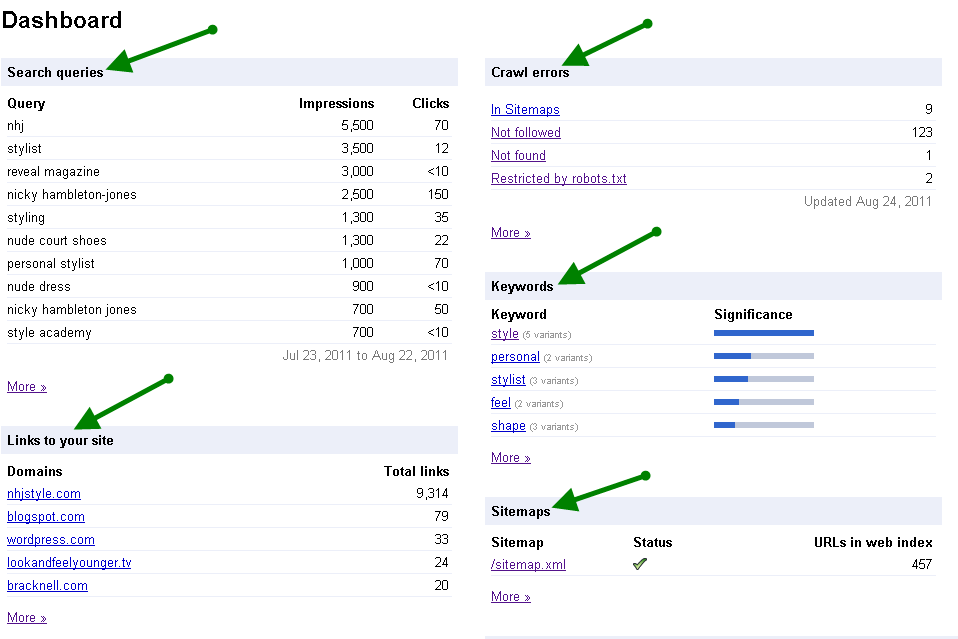
Dashboard
The dashboard is the first page you reach once you have picked your website profile within Google Webmaster Tools. Here you can see an overview of all the data that you can find in more detail within the tabs down the left hand side of the page:
If you don’t check GWT regularly, you can have these messages forwarded to your Googlemail account associated with the site.
Site Configuration
Sitemaps:
The sitemaps tab is where you can submit your XML sitemap. This is the best way to tell Google you have created and uploaded an XML sitemap for your site, which will help more pages of your site to be found by Google that may not have otherwise been crawled.
You cannot create an XML sitemap here, just tell Google that you have one on your site. You can create one using a tool such as Gsite Crawler and then upload it to your site. Make sure your sitemap is no larger than 10 megs and is in a XML format.
You may also see notifications in the sitemaps tab if you have errors in your sitemap, for example pages which redirect to other pages: 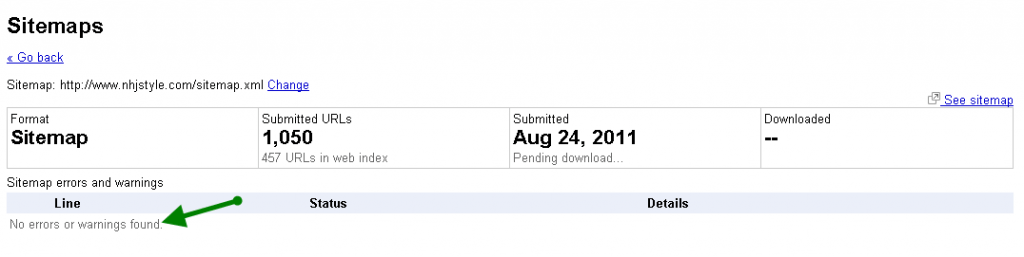
Crawler Access:
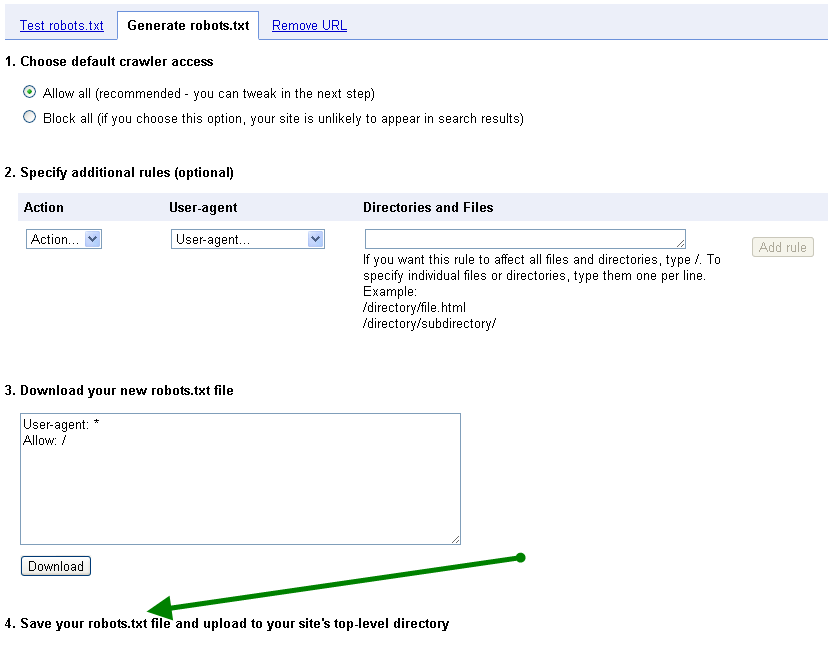
This tab is where you can test your robots.txt file.
You have the option to test it as different user agents, so if you are optimising for mobile, you can scroll to the bottom of this page and select ‘mobile’ from the drop down menu to test your robots.txt file as if it was being crawled for the mobile index. You can also test it for the images index.
In addition it can help you with AdWords by checking whether the AdWords crawler can access your website. This is important if you run AdWords campaigns for your site because if you accidentally block the AdWords crawler, you may have issues with Google being able to calculate the Quality Score of your AdWords campaigns.
You can build your robots.txt file here too, under the Generate Robots.txt tab. You can’t actually change an existing robots.txt file or upload it here. The page can be misleading if you aren’t familiar with the tool so don’t edit it on screen and think you have changed it on your site.
If you visit the ‘Remove URL tab’, you can request to have content that used to be on your site removed from Google’s index. This is useful if you have out-of-date information you might want to get rid of. It is important to ensure you have removed it from your site first though. There are some limitations with this and there are also lots of other ways to try to remove content from the internet.
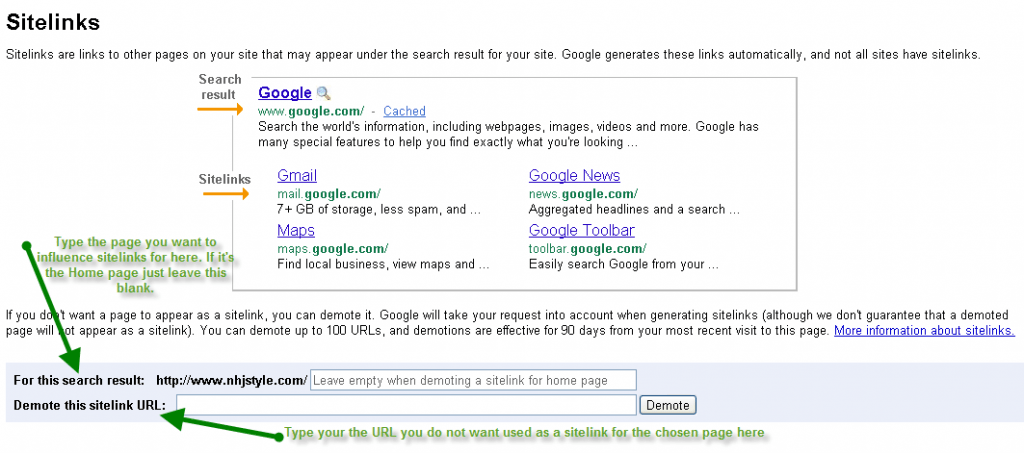
Sitelinks:
Sitelinks are generated automatically, but you can use the sitelinks tab in WMT to influence which pages of your site Google choose to use as sitelinks. You can do this by suggesting up to 90 pages of your site which you would not like to be used as sitelinks. This does not guarantee that they will not be used. This can be used on a page by page basis, so you can choose to ‘demote’ sitelinks based on which page appears in the SERPs.
Although it’s nice to have some influence, this function wouldn’t be very convenient if you have a very large site and would like to exclude more than 90 pages as sitelinks, per indexed page. It would be useful if you were able to exclude pages at a folder level, so for example any pages in the /shoppingbasket folder could be ignored. The fact that Google are not guaranteed to use your suggestions also makes it a bit unreliable; but then arguably most commands which we use to tell Google about things are often doubted as to whether they are 100% reliable, from No follow tags, to commands within robots.txt files or even canonical tags. So really, even if they said it was a definite command, would we believe them?
Change of Address:
If you are planning to move your site to a new domain, this is where you can notify Google of the change.
This means that for up to 180 days Google will swap your old URL for your new one in their index (LINK https://www.google.com/support/webmasters/bin/answer.py?answer=83106). This doesn’t last forever though, and once your new site has been crawled, your rankings from the old site will no longer be valid. This means that if you have made drastic changes to your new site, you’re very likely to see a change in rankings once your new site is crawled and the rankings for your old site no longer apply.
This period of up-to-180 days is useful though, as it could buy you time to sort out any other issues with a new site before you experience changes is rankings.
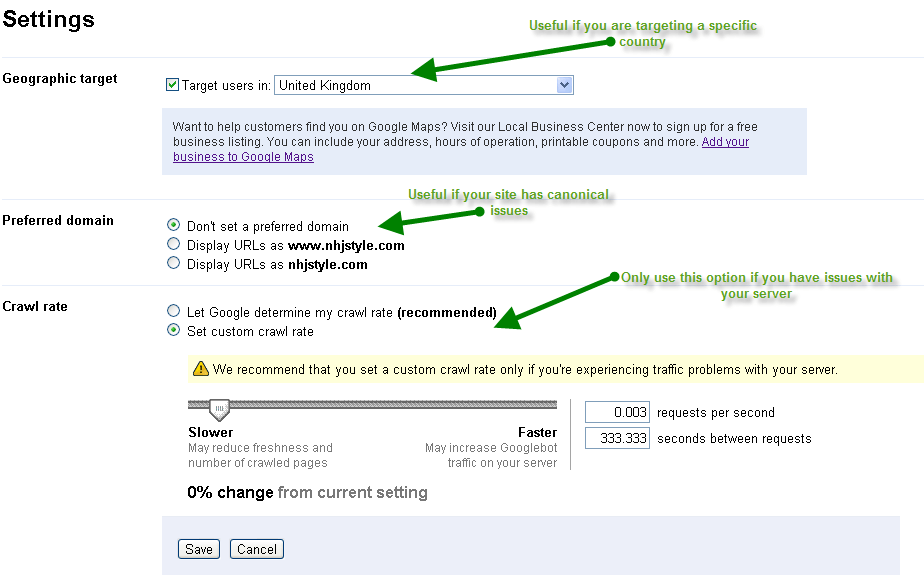
Settings:
Here you can choose what country you would like to target your site for. This is a nice idea, but isn’t the beauty of the internet the fact that it is global? If your site targets one specific country this can be helpful, but if you are a large site which aims to create a global presence, this isn’t much help.
You can select which version of your website domain you would like Google to index (with or without www.) in this tab too, which is ideal for sites that may have canonical issues. Although this doesn’t ‘fix’ canonical issues, it can help reinforce the chosen version of the site which you are working to optimise.
You can also select the rate at which you would like Google to crawl your site within the Crawl Rate option. Google has created their algorithm to ensure it crawls the optimum number of pages from your site based on your servers bandwidth, because of this, I wouldn’t recommend choosing your own crawl rate unless you have a specific reason to, such as issues with your server.
Choosing a high speed for your crawl rate won’t mean your site will be crawled more frequently or that it will be crawled more deeply. If you do turn it up too high, you may find it actually causes problems for your server.
URL Parameters:
This part of the tool is helpful if you are experiencing canonical issues with duplicate content on your site.
You could choose to exclude the duplicate versions of pages by excluding certain parameters that feature on the pages, for example session Ids.
You could use this part of the tools to exclude folders you may have excluded within your robots.txt as a way of reinforcing it. In my experience this functionality of Google Webmaster tools is quite reliable in performing these commands, so it is also important to be careful what you choose to exclude, as it can cause lots of pages to drop from the index.
Even if you are excluding duplicate content, it may be worth checking which version of the page is currently indexed, as you may find that by excluding the page you deem as ‘duplicate’ you exclude the only indexed version. This will likely see traffic to the page take a decline once it is gone from the index.
Your Site on the Web
Search Queries:
This part of the tool can give you an idea of the variety of terms your site is ranking for. Often we get carried away only considering the terms we are trying to target for rankings and forget about all of the additional terms you may already rank for. If you rank for a term that you believe is particularly irrelevant for your site, you might want to research that term in Google Analytics to see if you actually receive traffic for it and if you do receive a high level of traffic from it which does not convert, you may wish to adjust the content on your site to reduce mentions of the term. This might help you reduce irrelevant visits to your site.
This data is also useful if you are doing keyword research.
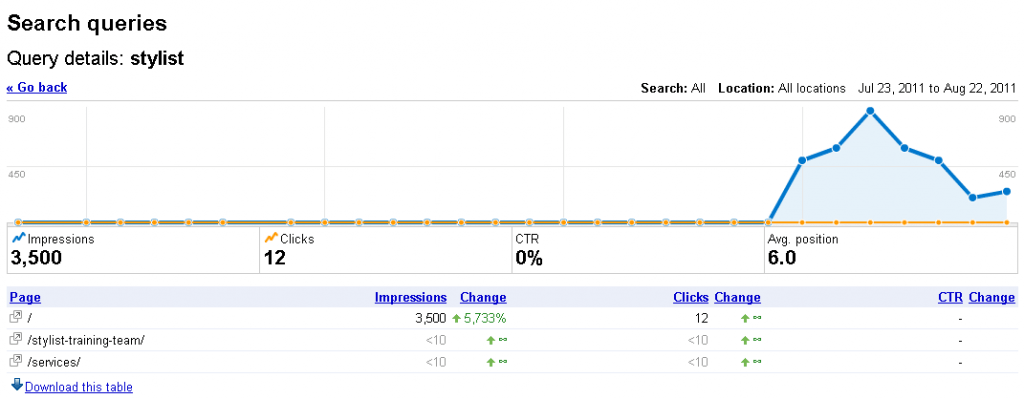
If you click on the search query, you can now see which pages it delivered traffic to, which is very helpful as it is an indication of what pages are ranking for which terms:
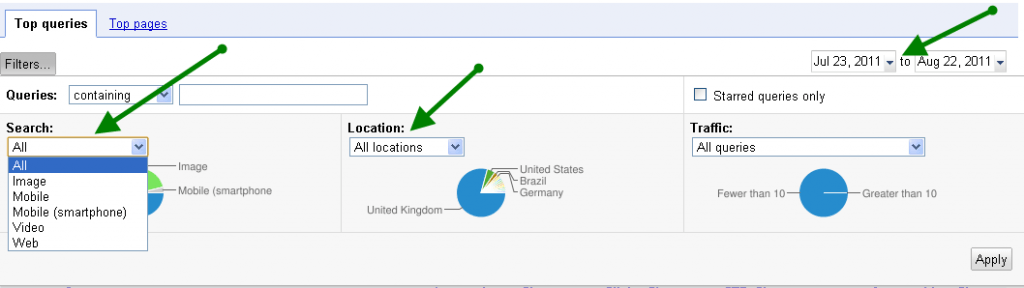
You can also filter this data to see which search queries delivered mobile traffic, smart phone traffic, image traffic, or video traffic. You can also filter this data based on selected date ranges . In addition, GWT also provides an indication of the increase or decrease in impressions, clicks and CTR for search queries. If your site is particularly relevant to a specific geographical area, you can also filter to see search queries by locations. As with all location data based on IP addresses it’s important to remember that it isn’t the most accurate indication of a user’s location.
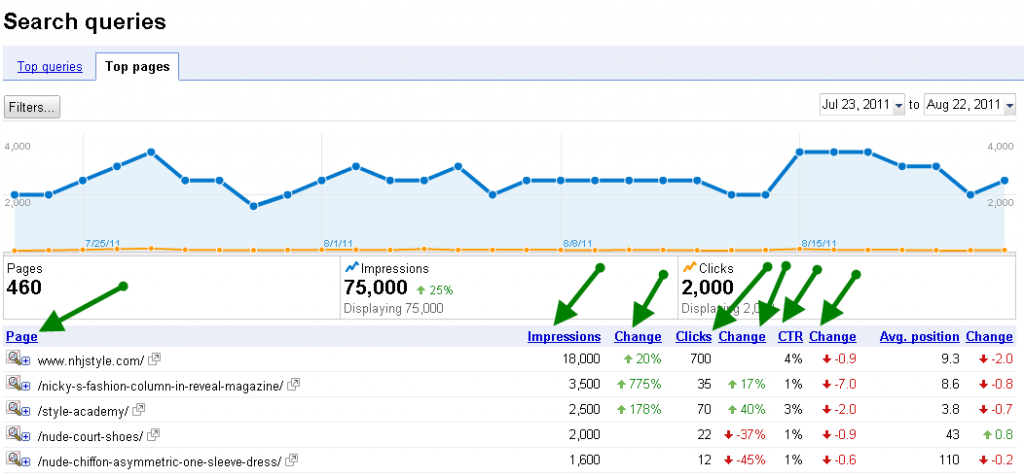
You can also view impressions and CTR by page when you click the ‘Top Pages’ tab. This is interesting as you could in theory split test your Meta descriptions and try to improve your organic CTR. Again though, the fact that this data can take a long time to be updated means that you would be limited in accuracy of results:
 The search query data in GWT is rounded, so it isn’t 100% accurate and is also only updated each time your site is crawled, so may not be up-to-date. GWT data will not be the same as Google Analytics data as they are tracked in different ways. For example GA uses Java which not all users have enabled, and GA data is updated more often than GWT.
You can get further information about your site on the web with the toolbar SEO Site Tools such as anchor text of links and whether they are followed links.
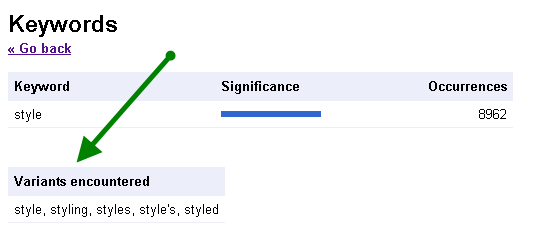
Keywords:
The keywords tab allows you to see what Google thinks your site is about, based on your content. If you click a keyword in this list it will show you variants of the keyword. This can be useful to give you ideas of other versions of the keyword which you can work into content to ensure it is not repetitive. Clicking a keyword from the list also gives you information on which pages on your site include it the most.
Again it’s important to remember that this data won’t be the same as the data in GA.
The internal links tab can be helpful to show you which pages you link to from within your site most. You may realise that it isn’t the pages you might expect, which could help you rethink your internal linking efforts. If you click a URL you can see which pages link to it. It would be great if this information was available in a diagram, as often it is easier to picture your internal linking strategy visually than with lists.
Subscriber stats is a nice extra in the tool. It works by telling webmasters how many people have subscribed to their RSS feeds using any Google product. This is a nice touch, but is not an accurate overview as it only provides information from Google products.
+1 Metrics
If you have implemented the +1 button on your site, you can see the impact having a +1 button makes and see if your CTR changes when +1 is used to create personal recommendations to users.
You can see how your site has performed achieving +1’s over a certain date range and how many new +1s have been achieved in that period, by clicking the Activity tab under +1 metrics.
Diagnostics
Malware
The malware tab allows Google to notify you if you are at risk of or have malware on your site. These notifications also appear in the messages tab. It is important to address this, as it can mean that your site is displayed with a warning within the SERPs. This is likely to deter potential visitors and result in a decrease in visits. Once you’ve addressed the issues, you can submit your site to Google again.
Crawl Errors:
This section has information on any pages which Google was unable to crawl.
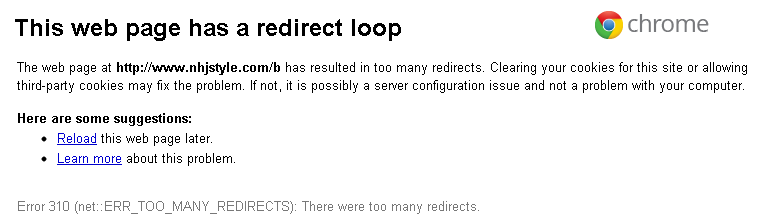
You can see crawl errors categorised by error types. You can see the URLs Google was unable to follow completely, under the Not Followed tab. If you click the URL, your browser will try to load the page and will tell you the reason the crawler is getting stuck, for example if it is in a redirect loop:
You can track any 404 errors under the Not Found tab, and also see which pages they are linked to from. The ‘Restricted by Robots.txt’tab lets you can find any pages you are blocking via your robots file.
You can also find errors in your sitemap here. This might be redirect errors which need to be removed from the sitemap so they are no longer included.
All this data can be exported which is useful if there is a large level of links to amend. When you export 404 pages, you’re not able to export the pages which link to the broken links unfortunately; well, not as far as I am aware.
All of this data is that it is only updated each time the site is crawled. This means that if the links have already been fixed, they may still appear as broken in GWT.
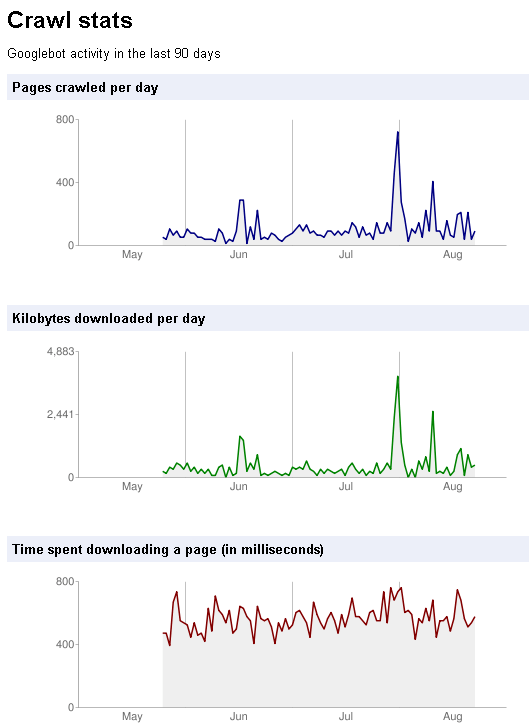
Crawl Stats:
This section can give you an indication of the number of pages Googlebot crawls, the number of kilobytes downloaded and how long it has spent downloading them. This information is useful to check if your site is being crawled too often, which you may want to keep an eye on if you have limited server resources to ensure crawlers are not blocking users from reaching the site by visiting too often. If you can see that there may be an issue with the level of crawler access, you could choose to restrict the crawl rate of your site as discussed above in the settings tab.
The Fetch as Googlebot tab is useful if you want to check that a certain page is accessible to Google. Once you have fetched the page, you can then submit it to Google for inclusion within their index. At this point you can choose to submit the page and all other pages which it links to, or to submit this URL alone. Submitting pages via this method does not guarantee that they will be indexed. You can’t submit multiple pages at once, however if you are looking to submit your entire site, you could consider refreshing your sitemap and resubmitting that instead.
HTML Suggestions
This tab can be useful as a mini checklist of on-page elements you may wish to optimise your site for. You can see if you have duplicate Meta Descriptions and which pages they are used on.
You can see if any of your Meta descriptions are too long and may not fit well in the SERPs, as well as those which Google suggest are too short. In addition you can see which pages do not have title tags, have duplicate, short or long title tags or ‘non-informative’ title tags (these are tags such as ‘Home’.
The section for Non indexible content can tell you if there are issues with any media rich content such as video or images that could not be indexed.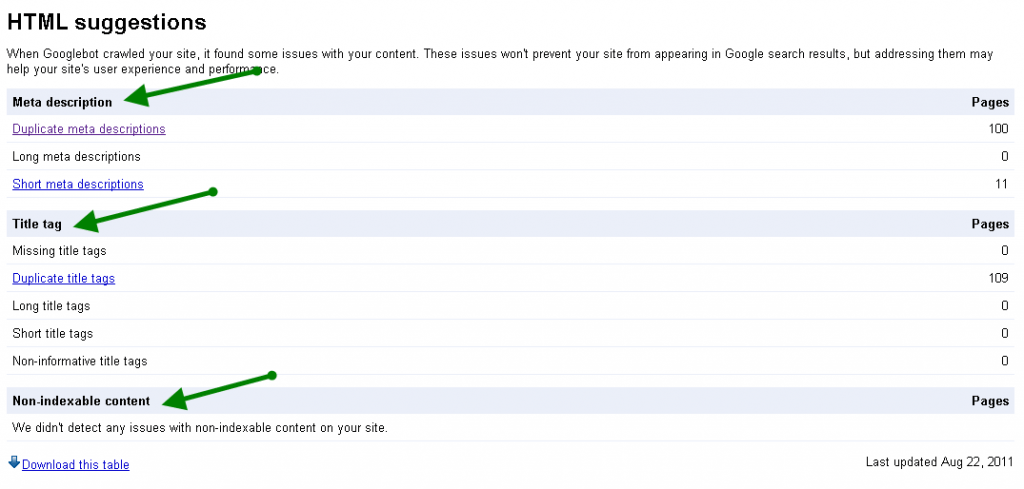
Labs
The labs tab contains any areas that Google are currently testing within GWT.
The video sitemaps tab within this section allows you to check if Google has found any errors with a video sitemap if you have created one. As this data is not updated immediately, you may have to wait a while before checking to see if your video sitemap has been found once you have added it to your site.
The Site performance tab allows you to see if your site has any loading speed issues. Although this data is not 100% accurate, it is a good indication as to whether Google has picked up on site speed issues that could potentially affect your rankings.
Overall, Google Webmaster Tools is an excellent tool to give an indication of issues that may occur with a website being crawled by Google. It is important to remember that data in most areas of it is not always up to date, and might not always be entirely accurate, however if it is used as an indication it can be very helpful to ensure your site is optimised for search engines.
Hopefully this post has given you some ideas of how you might use Google Webmaster Tools, but please add anything you think I may have missed in the comments field below.
Leave a Reply